The history of engraving dates back to ancient China, but this type of art was especially widespread in Europe during the Middle Ages and the Renaissance following it. The secrets and techniques of making engravings, having undergone some transformation, have come down to us.
The process of creating a real engraving is complex and requires some preparation, availability necessary tools, knowledge of technology, physical strength and experience. There are many various techniques and techniques that professional engravers are familiar with. Despite the complexity and multi-stage nature of this type of creativity, engravings are very popular.
Works of art in the style of engraving are very valuable for their special presentation of the drawing, the efforts of the master spent on creating unique paintings on this technique, as well as ample opportunities for creative self-expression, allowing you to draw true masterpieces.
Now every child can try himself in this difficult art. To do this, you do not need to study for a long time and buy expensive materials and tools. Did you know that there are, they are the most popular. The attention of modern children and their parents is presented with numerous sets for children's creativity in the genre of engraving, which is easy and simple to deal with.
What is a children's print?
The technology for creating children's engravings is very different from the real one. The set of a young engraver consists of a blank and special tool- a shtichel. The blank is a sheet of thick cardboard on which two layers of paint are applied. The first layer is the base, the second layer is the engraving surface itself. The children's engraver is presented in the form of a pen with a metal tip bevelled on its side.
This shape is modeled after a real professional instrument of the same name. The special angle of the bevel of the metal part of the engraver is designed for the convenience of removing the surface layer of paint. The workpiece has already been marked with an outline of a drawing that the child will have to engrave. Passing the engraver over the dark top paint, the child easily cleans it off, and the base paint appears in the resulting “free” stroke. For greater aesthetics and elegance of the resulting work, manufacturers make the base layer silver or golden. The resulting paintings are very reminiscent of real engravings, and it is really very beautiful.
At what age can one begin to get acquainted with engraving?
The simplest kits for creativity this direction designed for children 5 years old. The drawing in such blanks is distinguished by simplicity and large details, and the base paint, as a rule, is rainbow, which is very popular with five-year-olds. For older children, you can choose more complex pattern with small lines. The theme of the image for engravings can be different. Here it is better to focus on the preferences of your child. It can be any animal, an ancient castle or a copy of a real building, a bouquet of flowers or an image of a ship, car, aircraft. Each child will be able to find the drawing that will suit his taste.
Does the child need help in the first stage?
Yes. Despite all the accessibility and simplicity of children's engravings, an adult must explain to the child exactly how to hold the tool, how to position the drawing in order to achieve best results. The engraver must be tightly clamped in the palm of the working hand - so that it is convenient to press, and the tool does not dangle from side to side. When drawing lines, you need to make movements not from yourself, but, on the contrary, towards yourself. This technique allows you to better control the uniformity of the removal of the paint layer and rationally distribute efforts. If it becomes necessary to draw a curved line, it would be better if the child could move not a hand with a chisel clamped in it, but a sheet of paper. This is especially important if he wants to continue his acquaintance with the art of engraving and move from children's sets to a more difficult level by engraving on metal or wood.
To get acquainted with the “engraving” style and gain the first experience, you can use the creative kit, which is called “Engraving”. These kits can be bought in stores with art departments as well as online stores. Models for works are offered of varying complexity, there are simple small pictures, but there are also quite complex and subtle paintings. The recommended age of the engraver is indicated on the package. At the same time, such an activity can captivate both a schoolboy and a completely adult person. In the picture presented for example, the age of 3 years is indicated. But the children in younger age Must work under adult supervision.
2 step
The engraving blank looks like a dense sheet of metallized paper coated with a tinted layer, on which the contours of the future drawing are applied. Metallized paper is different colors: silver, gold or rainbow (iridescent colors).
3 step
The set also includes a tool for performing work - a chisel. With this tool, notches are made on the upper dark layer, through which the metallized layer appears as a result. The chisel is similar to a pen, only it has a metal shaft. For safety, a cap is put on the tip when the engraver is not being used. If the work is done by children, then it is necessary to control the handling of the engraver so that there are no injuries.
4 step
To make an engraving, all the drawn strokes should be applied, removing the tinted layer in these places. The chisel can make thin cuts or wider cuts, depending on which side you turn it. Such work requires perseverance and accuracy.
Creative activities are an integral part of the upbringing and education of the child. There are many types art where kids of all ages can create. For example, engraving for children is a technique that can be mastered as early as three years old. But such creativity will also be interesting for teenagers and parents.
Engraving as a form of visual art
Very often, this creative technique is put on a par with fine art. Indeed, these varieties of creativity have enough in common. Crafts in the engraving technique involves removing the protective layer using a special tool - a spatula or pen. Today on sale you can find ready-made kits for creating such a masterpiece. An alternative option is to do the craft from and to with your own hands. Let's consider this technique in detail and try to understand why engraving is useful for children?
Ready-made kits for factory-made creativity

Today, in any toy or stationery store, you can find a wide variety of sets for children's creativity. There are among them those that are intended to be created. Usually, such a set includes a basis for creating a three-dimensional drawing, a special spatula / engraver and instructions. Under a black background, a white or colored base can be hidden. For ease of use, usually the lines to be drawn with the tool are already marked in color on a black base. The cost of the Engraving for Children set ranges from 100-500 rubles. It all depends on the size and complexity of the drawing. Please note: the recommended age must be indicated on the packaging young artist. For the little ones choose simple pictures small in size, and for older children and adults - more complex. Attention! At the age of 3-5 years, kids are recommended to make engravings only in collaboration with adults. The task of parents is to tell about this creativity for children, show the basic techniques and control the whole process.
Making an engraving using a candle
If you want to make a set for creativity no worse than in a store, you can do it yourself at home. To do this, take a cardboard picture, you can use, for example, a page from a torn book. Cut out the base to the right size. Next, rub it with a regular candle or a piece of paraffin. The layer should be even and uniform. Then cover the workpiece with a thick layer of gouache without adding water. Leave to dry for several hours. After that, your engraving for children is ready, you can start creating. Invite the child to clear the whole picture or some of its individual elements. You can also take an ordinary piece of cardboard, paint it arbitrarily with paints, and then cover it with wax and gouache. It is more convenient to draw pictures on such an engraving without completely removing the paint.
How to make an engraving with your own hands without wax or paraffin?

If you do not have a candle at home, you should not be upset. Take cardboard or a sheet of thick paper and paint the base well with these pencils, and on top, as in the first method, apply gouache and dry. Another option involves the use of a finished picture and film. Ordinary packing bags, file folders or thin plastic packaging will do. Glue a piece of film to the base with a glue stick, apply gouache on top and dry. Making engravings is also possible from glossy pictures. And this is one of the most simple ways. Take a page from a magazine, a coloring book cover, or some other glossy picture. Apply gouache directly on it and after complete drying, start creating. Preschoolers are advised to use thin tools when creating engravings and try to hold them like a pencil or pen - this will help to adapt the hand to writing.
The benefits of this type of creativity

Children's prints are interesting and very useful crafts. This type creativity develops fine motor skills, teaches the child to be attentive and assiduous. If you use a purchased set, the baby learns to trace and draw the correct lines. Many kids love homemade engraving bases that don't have markings on them. When working with such material, each time you have to guess what is hidden under the paint and where it should be erased. Interesting and arbitrary drawing on the basis to create an engraving with a multi-colored background. Try to create with your child, using both ready-made kits and homemade ones. Remember that the finished craft can be a wonderful interior decoration or great gift on a holiday to one of the relatives.
Creativity for children is a limitless possibility of self-expression and development. Never forget this and try to regularly make a variety of decorative crafts with your daughter or son.
Today, I wanted to dedicate a master class for children to an interesting and one of the most ancient drawing techniques. We are talking about engraving, which can become the discovery of a great world visual arts both for you and for your child.
The creative vein has always been present in people and caused a desire to leave their mark on various surfaces, which was the beginning of the creation of interesting and unusual techniques drawing. After all, what could be easier than scratching a drawing on a stone, clay tablet or wood? If you fill the grooves with paint, you get bright drawing which will last for quite some time. Thus, one of the oldest drawing techniques, engraving, was born. She came from the jewelry business, all the tools and techniques are used by jewelers to this day. It is very versatile and includes many different performance techniques. This is linocut, and engraving on metal, on cardboard, woodcut and lithography. The advent of engraving technique served as an impetus for the creation of printing presses.
Many great artists paid great attention to engraving and created amazing and beautiful masterpieces. One of the brightest masters was Albrecht Dürer.
How to engrave
Creating an engraving with your own hands, no matter how strange it may seem, is a rather simple matter. Children's drawings can easily be diversified by offering the child the technique of engraving or its imitation - scratching, scratching in a pattern plate coated with colored paint or wax.
These engraving classes at home will perfectly entertain the kids, contribute to the development of love for beauty. And they will be the first steps in art. Working in this technique contributes to the development of the child fine motor skills, perseverance and accuracy.
Even small children can create paintings in this technique. For kids, you can simplify the process and they will need the help of adults. For this technique we need:
- thin plates of foam or expanded polystyrene;
- a stick for scratching a picture, a graver or a regular ballpoint pen.
- scissors;
— colored paper;
- paints;
- rubber roller for rolling work.

The child can draw a drawing on the styrofoam plate with a ballpoint pen by pressing harder on it.

You will get a drawing, the contours of which are pressed into the material.

Let's cut out the city and put it on a tray so as not to stain everything around with paint.
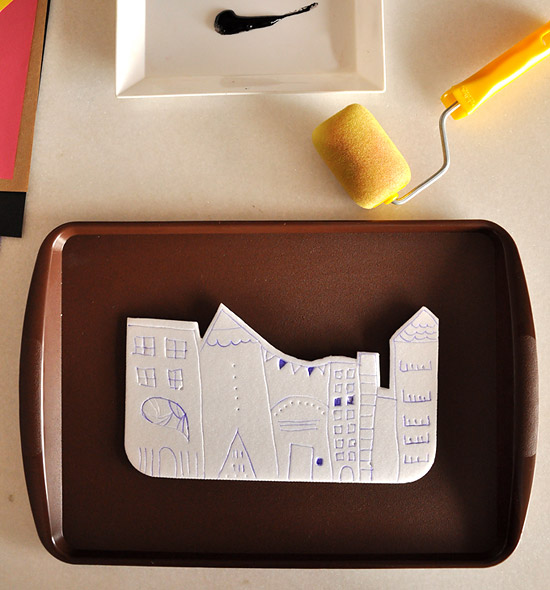
Using a roller, apply paint to the plate.

Lay it on a sheet of colored paper and press firmly.

Carefully removing the plate from the paper, we will see the resulting engraving.

Svetlana Bolshakova
Recently, going through my old notes from the courses, I found two printed sheets, two old engravings.
This engraving made of cardboard

And here, in addition to cardboard, lace is used

We were shown techniques for working with prints, preparing clichés for printing engravings. Then I really liked this technique. The matter was approaching March 8 and I decided to do it with the guys for moms postcard engraving. I made the cliche myself from cardboard, and the children only painted with gouache and made an impression on paper. Cardboard quickly soaked, flaked and fell into disrepair. Preparatory work seemed difficult to me and more I engraving did not return to work with children. But, finding old leaves with engravings I wanted to remember how it's done.
Engraving on cardboard(from the French gravure) - cut, create a relief - a kind of print. A relief imprint of a seal is made with the help of an application, made up of individual cardboard elements. The thickness of the cardboard must be at least 2 mm. Engraving came from jewelry. She is very multifaceted: linocut, metal engraving, engraving on cardboard, woodcut, lithography. There are many ways to take impressions from natural objects: leaves, feathers, flowers. Grating is an imitation engravings.
I want to show you how engraving on cardboard. I took 2 identical cardboard boxes 11x15 cm.

I cut out a frame from one and glued it to the second, although this is not necessary

I decided to make a vase with flowers, cut out a vase and individual elements To her

I cut out flowers, their centers, leaves and parts of leaves.


All glued to the base

I decided to take burgundy gouache

But I didn't like it.

Painted black

Strongly pressed when stroking with fingers on the left, again not that

Painted again and made a print. Well, now you can stick it on paper and insert it into a frame

But my cliche got wet after three times and the elements began to delaminate

In searching for material on this topic on the Internet, I found recommendations for working with children using polystyrene and ceiling tiles. This is what we did yesterday with my corn-lover guests. (I talked about this in a previous post) - engraving using polystyrene - a substrate for vegetables. I had one such "bowl" of mushrooms, I cut it, first I tried it on my granddaughters


My gouache is good, professional and it is not necessary to dilute it with water. And children's gouache needs to be diluted to the density of sour cream. The first impression may not work, but the second one will be better. Such an engraving will never get wet and children will be able to draw a drawing with a ballpoint pen, paint over with gouache and make an impression.


We littered the gouache in vain, the drawing is not very clearly visible.
Related publications:
It's the most magical time of the year - spring! When all nature is transformed, migratory birds flew in, flowers blossomed, appeared.
Master class "Drummers" Senior preschool age. Dear colleagues, I have already introduced you to the project “ Musical instruments their own.
To make such a carnation you will need: corrugated paper in two colors (green and red, scissors, PVA glue, a tube. To begin with.
This is an exciting opportunity to try yourself as a real watchmaker and decorator. And to breathe life into your new ones.